
How to Do a Perfect At-Home Gel Manicure: Step-by-Step Guide
Salon nails are gorgeous, but not everyone has the time or budget for weekly appointments. The good news is that a flawless gel manicure is completely doable at home. Gel polish gives you that high-shine, chip-resistant finish that lasts up to two weeks without fading. All it takes is the right tools, a clean prep routine, and a little patience. Once you get comfortable with the process, it becomes genuinely enjoyable — like a mini self-care ritual every few weeks.
Below are 7 steps and key tips for achieving the perfect at-home gel manicure, broken down simply for real results.
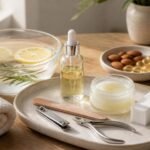
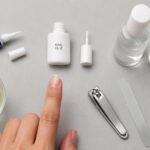
Step 1: Gather All Your Supplies First

Starting without the right tools is the fastest way to ruin a gel manicure before it even begins.
Must-have tools: Gel base coat, gel color polish, gel top coat, LED or UV lamp, nail file, buffer, and cuticle pusher.
Cleanser tip: Keep rubbing alcohol or a dedicated gel cleanser nearby — you’ll use it multiple times throughout the process.
Lamp note: An LED lamp cures gel in 30–60 seconds per layer, making it faster and more efficient than a UV lamp.
Laying everything out before you start keeps you focused and prevents the rushed mistakes that cause lifting or smudging. Think of it as setting up your personal nail station.
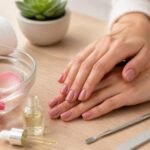
Step 2: Prep Your Nails Properly

Nail prep is the single most important factor in how long your gel manicure actually lasts.
First move: Remove any existing polish completely, then soak fingertips briefly in warm water to soften cuticles.
Cuticle care: Gently push back cuticles with a wooden or rubber-tipped pusher — never cut them unless absolutely necessary.
Buffing step: Lightly buff the surface of each nail to remove natural oils and create a slightly textured surface for better gel adhesion.
Finish by wiping every nail with rubbing alcohol on a lint-free wipe. This removes dust, oil, and any leftover residue so the base coat bonds cleanly from the start.
Step 3: Apply the Base Coat

The base coat is your foundation — skip it and your color will lift within days no matter how carefully you apply everything else.
Application rule: Use a thin, even layer and keep it off the cuticles and skin to prevent premature peeling.
Edge tip: Lightly brush the free edge of each nail with base coat to seal it and stop chips from starting at the tip.
Cure time: Follow your specific product’s instructions — most LED lamps need 30 to 60 seconds per layer for a full cure.
Once cured, the base coat should feel firm and slightly tacky. That tacky layer is completely normal and is exactly what helps your color coat grip properly.
Step 4: Apply Your Gel Color

This is the most satisfying part — watching your chosen shade go on smooth and glossy under the lamp.
Layer rule: Always apply two thin coats rather than one thick coat. Thick layers cure unevenly and can wrinkle or stay soft inside.
Coverage tip: If your color looks a little sheer after the first coat, that’s expected — the second thin layer will give you full opacity.
Avoid skin contact: Any gel polish that touches the skin around your nail will cause lifting, so keep your strokes clean and deliberate.
Cure each layer fully before applying the next. Rushing this step is one of the most common reasons at-home gel manicures don’t last as long as they should.
Step 5: Seal Everything with a Top Coat
The top coat is what gives gel nails their signature mirror-like shine and locks in your color for the long haul.
Application tip: Brush the top coat over the entire nail surface and seal the free edge just like you did with the base coat.
Sticky layer note: Many gel top coats leave a tacky or inhibition layer after curing — wipe it off with a lint-free wipe soaked in gel cleanser.
Finish check: After wiping, your nails should look completely glossy, smooth, and dry to the touch immediately.
Do not skip this step or rush through it. The top coat is the barrier between your color and everything your hands touch all day.

Step 6: Add the Finishing Touches
Your nails are cured and shiny — but one final step makes the whole manicure look polished and professional.
Cuticle oil: Apply a nourishing cuticle oil around each nail immediately after finishing to restore moisture and give a clean, tidy look.
What to avoid: Skip heavy hand creams or lotions right after application since oils around the nail edge can reduce your gel’s lifespan.
Clean-up trick: Use a small brush dipped in acetone to tidy up any polish that touched the skin before you cured it.
This last step takes under two minutes but makes a visible difference. It’s what separates a rushed at-home mani from one that looks genuinely salon-worthy.
Step 7: Follow These Tips to Make It Last Longer
Getting the gel on is only half the battle — how you treat your nails afterward determines whether they last one week or two.
Cap your edges: Reseal the free edge with a swipe of top coat every few days to prevent chipping from the tips.
Gloves for chores: Wear rubber gloves when washing dishes or cleaning — prolonged water exposure weakens the gel bond over time.
Moisturize daily: Apply cuticle oil once a day to keep your nail beds healthy and prevent the polish from drying out and cracking.
Avoid peeling: Never pick or peel gel polish off — it damages the nail plate underneath and creates uneven, weakened layers that are harder to work with next time.
The effort you put into aftercare directly extends how good your manicure looks and how long it stays intact. Small habits make a big difference here.
FAQs About At-Home Gel Manicures
How long does an at-home gel manicure last? With proper prep and application, a home gel manicure typically lasts between 10 and 14 days before noticeable lifting or chipping begins.
Do I need an LED lamp or will a UV lamp work? Both work, but an LED lamp cures gel much faster — usually in 30 to 60 seconds versus 2 minutes per layer with a UV lamp.
Why is my gel polish lifting at the edges? Lifting is almost always caused by oil or moisture on the nail surface before application, or gel polish touching the skin or cuticles during application.
Can I do gel nails on natural nails without acrylics? Yes, absolutely. Gel polish is designed to work directly on natural nails and actually protects them from breakage during wear.
How do I remove at-home gel nails safely? Soak a cotton pad in acetone, place it on each nail, wrap with foil, and leave for 10 to 15 minutes. The gel should slide off gently without scraping.
Is it bad to do gel manicures frequently? Regular gel manicures are fine as long as you moisturize consistently, remove properly, and give your nails a break every few months to recover.
Why Your Nail Prep Makes or Breaks Everything
Most people focus heavily on the polish and the lamp, but the truth is that preparation is where perfect gel nails are actually won or lost. A nail that hasn’t been properly buffed, cleaned, and dried will reject gel polish no matter how carefully you apply it. That sticky, oily surface creates a barrier that prevents the base coat from bonding correctly.
Think of nail prep the same way you’d think about priming a wall before painting. The smoother and cleaner the surface, the better everything adheres — and the longer it stays put. Spending an extra five minutes on prep can easily add four or five more days to your wear time.
It’s also worth mentioning that cuticle health plays a bigger role than most people realize. Dry, overgrown cuticles that creep onto the nail plate give gel polish nowhere clean to bond at the base. Keeping them soft, pushed back, and moisturized daily is one of the easiest ways to dramatically improve your at-home gel results.
Nail It Every Time
The more you practice your at-home gel manicure, the faster and more confident the whole process becomes. What takes an hour the first time can easily drop to 30 minutes once your technique is dialed in. That’s still a fraction of the time and cost of a salon visit.
Invest in a good LED lamp and a quality gel polish set — they genuinely make a difference in cure time, shine level, and how long the color holds. Cheaper kits often require more layers and still don’t last as well.
Most importantly, enjoy the process. Putting on a good playlist, taking your time with each layer, and finishing with a little cuticle oil is genuinely relaxing. You’re not just doing your nails — you’re giving yourself a quiet moment that’s entirely yours.
The perfect at-home gel manicure is absolutely within reach. Follow each step with care, and your nails will look like you just walked out of a salon every single time.
at home gel manicure, gel nails at home, DIY gel manicure, gel nail tips, how to do gel nails


