
Can You Do Dip Nails Without Activator? The Honest Truth Explained
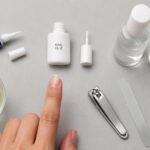
Dip powder nails have taken over the beauty world for good reason — they are chip-resistant, lightweight, and deliver a salon-smooth finish that lasts for weeks. Most at-home dip nail kits walk you through the same steps every time: base coat, dipping powder, activator, and top coat. But what happens when you reach for the activator and realize it is empty or missing from your kit entirely? It is one of the most Googled questions in the DIY nail community right now.

Below is the honest, detailed breakdown of whether dip nails work without activator, what happens when you skip it, and exactly what your alternatives are.
What Does Activator Actually Do in a Dip Nail System?
Activator is far more than just another bottle in your dip nail kit — it is the step that makes the entire system work the way it is supposed to.
Chemical function: Activator triggers a hardening reaction within the dip powder layers, transforming the soft powder into a firm, durable nail surface.
Timing tip: Apply activator after each dip powder layer rather than only at the end to build maximum strength throughout the full nail thickness.
What it replaces: Activator eliminates the need for a UV or LED lamp, which is why dip nails are popular with people who want a gel-strength result without extra equipment.
Without activator, the bonded layers of dip powder simply have no chemical trigger to harden. Think of it as the ingredient that turns your individual powder layers into one unified, strong nail coating rather than a pile of loose pigment held in place with hope.
What Actually Happens When You Skip Activator?
Skipping activator does not just reduce quality slightly — it fundamentally changes what the dip nail process can deliver on your fingertips.
Texture result: The powder layers stay grainy and rough rather than smoothing into the glassy, polished surface that makes dip nails so appealing.
Durability problem: Without the hardening reaction, nails feel soft and flexible — they are far more likely to chip, crack, or peel within just two or three days of wear.
Top coat issue: Top coat applied over unhardened powder sits unevenly, creates a bumpy finish, and may peel away in sheets rather than bonding cleanly to the surface.
You can technically complete the steps in sequence without activator and end up with colored nails — but the result is nothing close to what a proper dip manicure delivers. The difference is dramatic and immediately visible to anyone who has done dip nails before.
DIY Alternative 1: Clear Gel Polish and a UV or LED Lamp
The closest substitute to activator that many at-home nail enthusiasts reach for first is a gel top coat combined with an LED or UV lamp.
How it works: Applying a clear gel polish layer over the dip powder and curing it under a lamp forces a hardening process through UV light rather than a chemical reaction.
Result quality: This approach creates a hybrid dip-gel finish that is noticeably stronger and smoother than using no activator at all — though still not identical to the real dip system.
What you need: A standard LED nail lamp and any gel top coat you already own from a previous gel manicure kit works perfectly for this method.
This option works best for people who already own a gel lamp and simply ran out of activator mid-manicure. It requires an extra piece of equipment but delivers the most comparable result of any available substitute.
DIY Alternative 2: Multiple Layers of Strong Clear Top Coat
If you have no lamp and no gel polish available, layering a strong regular top coat over your dip powder is the most accessible emergency option.
Application method: Apply three to four thin layers of clear nail polish or dip-specific top coat over the unhardened powder, allowing each layer to dry completely before adding the next.
Strength reality: This method offers some surface protection and gives the nails a smoother visual appearance, but the underlying powder layers remain relatively soft and far less durable.
Best use case: This works acceptably as a same-day temporary fix when you need your nails to look presentable for a specific event in the next few hours rather than for weeks of wear.
Manage your expectations with this approach. It is a short-term cosmetic solution rather than a genuine replacement for what activator accomplishes at the chemical level within the dip system.
DIY Alternative 3: Isopropyl Alcohol as a Temporary Smoothing Hack
This is the most unexpected option in the at-home nail community and it does have genuine practical value as a very short-term fix.
How to apply it: Lightly brush 91% or higher isopropyl alcohol across the dip powder surface using a clean brush before sealing with top coat for a smoother, less grainy finish.


What it does: The alcohol temporarily binds loose powder particles together at the surface level and removes excess dusty texture without triggering a true chemical hardening reaction.
Important limitation: This is genuinely a surface-only hack — the deeper powder layers remain uncured, so durability is still significantly lower than a properly activated dip manicure.
Use this technique if the grainy texture is your main concern and you just need the nails to look smooth enough to get through a single day or evening. It is not a long-term solution by any reasonable standard.
Best Practices for Long-Lasting Dip Nails Done Right
When you do have your full kit assembled properly, a few habits make the difference between dip nails that last one week and ones that stay perfect for three.
Layer thinness: Apply the base coat and powder in thin, controlled layers rather than building thickness quickly — thin layers adhere more evenly and cure more completely throughout.
Nail prep rule: Buff the nail surface lightly before starting but avoid over-filing natural nails, which weakens the nail plate and reduces how strongly the dip system bonds.
Edge sealing: Brush the activator, top coat, and base coat across the very tip of each nail to seal the free edge completely — this is where chipping almost always begins first.
Cuticle care: Apply cuticle oil daily during the wear period to keep the skin around the nail bed hydrated and prevent the dip coating from lifting prematurely at the base.
These habits turn a good dip manicure into an exceptional one. Proper technique with the right products is the only real shortcut to salon-level results at home every single time.
FAQs About Dip Nails Without Activator
Can nail glue be used instead of dip nail activator? No. Nail glue is an adhesive that bonds surfaces together but it cannot trigger the chemical hardening reaction that activator creates within the dip powder layers.
How long will dip nails last without activator? Without activator, dip nails typically last only two to four days before chipping, peeling, or breaking — compared to the two to three weeks you get with a properly activated system.
Is dip nail activator the same product as top coat? They are completely different products. Activator hardens the powder through a chemical reaction before any sealing, while top coat adds shine and surface protection after the powder has already been cured.
Can I order activator online and use my nails temporarily in the meantime? Yes — using the gel polish and lamp method or the strong top coat layering approach can hold your nails for a few days while you wait for your activator to arrive.
Will skipping activator damage my natural nails? Not directly, but soft uncured dip powder is more fragile and more likely to snap or peel in ways that can pull layers of natural nail with it during removal if you are not careful.
Are all dip nail activators the same or brand-specific? Most dip nail activators work across brands because they share the same basic cyanoacrylate-activating chemistry — but staying within one brand system generally delivers the most consistent and reliable results.
The Step That Holds the Whole System Together
Dip nails have a reputation for being one of the most beginner-friendly nail systems available precisely because the chemistry does the hard work for you. Every other step — the base coat, the powder, the top coat — is essentially preparation and finishing. The activator is the moment where all of that preparation actually becomes a real manicure.
It is worth thinking about the full kit before you begin rather than discovering a missing product halfway through the process. Checking that you have base coat, powder, activator, and top coat before you start saves the frustration of improvising mid-application and getting a result that disappoints you.
If you do find yourself regularly running out of activator mid-kit, it is worth buying an extra bottle separately so you always have a backup ready. It is the one product in the dip system where running out genuinely has no fully satisfying workaround.
The Honest Bottom Line
Dip nails without activator are technically possible but practically underwhelming. The alternatives covered in this article — gel polish and lamp, layered top coat, and isopropyl alcohol — each offer something useful in a specific situation, but none of them replicate what proper activator delivers in terms of strength, smoothness, and longevity.
If you want the beautiful, hard-wearing, chip-resistant finish that made you fall in love with dip nails in the first place, activator is not optional. It is the one product in the entire system that cannot be fully substituted without accepting a meaningful drop in results.
The good news is that activator is inexpensive, widely available online, and a single bottle lasts through many manicures. Adding a spare to your kit today means you will never have to compromise your results because of an empty bottle again.
Your nails deserve the full system done right — and with the complete kit in hand, achieving salon-quality dip nails at home is genuinely within reach every single time.
dip nails without activator, dip powder activator substitute, dip nail tips at home, how dip nails work, DIY dip manicure guide


