
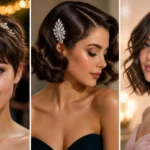
10 Stunning Long Curly Hairstyles That Show Off Your Volume, Bounce, and Natural Beauty
Long curly hair is one of the most dynamic, expressive, and genuinely beautiful hair textures in the world. Every curl pattern is different, every head of hair has its own personality, and the styling possibilities are truly endless.
But long curls also come with their own set of needs — they crave moisture, they respond to technique, and they look their absolute best when worked with rather than against.
The right hairstyle doesn’t fight your curl pattern or flatten your volume. It celebrates both.
Whether your curls are loose and flowing or tightly coiled and full of life, there is a long curly hairstyle that will make you feel completely unstoppable.
Below are 10 stunning long curly hairstyles picked for volume, definition, wearability, and the kind of natural beauty that makes people stop and stare.
1. Layered Curls with Face-Framing Pieces
Layered curls with face-framing pieces are one of the most transformative combinations in curly hair styling. Layers remove the weight that drags curls downward, allowing them to spring up, bounce freely, and create a shape that feels genuinely alive.
The face-framing pieces are the real magic here. They soften the face, draw attention to your best features, and give the overall look a sense of movement and dimension that flat, one-length curls simply can’t replicate.
This style works particularly beautifully for curl types 2B through 3B — the lighter weight of removed bulk lets spirals spring up and frame the face in the most flattering way.
Apply curl-enhancing mousse to the face-framing sections: Focusing product on these pieces keeps them defined and springy rather than frizzy against your face all day.
Choose your part based on your face shape: A center part suits oval and heart-shaped faces beautifully, while a deep side part is universally flattering for most face shapes.
Add subtle highlights or balayage to enhance the layered shape: Color placed through the layers adds dimension that makes the cut look even more intentional and beautiful.
Dry the face-framing pieces separately with a diffuser: Giving extra attention to these sections prevents them from frizzing out while the rest of your curls dry naturally.
Ask your stylist for “curtain layers” rather than blunt layers: Graduated layers that soften around the face rather than cut across it work more harmoniously with natural curl patterns.
Layered curls with face-framing pieces is the style that makes people assume you just stepped out of a salon — even when your hair has simply been allowed to do its natural thing.
FAQs: Layered Curls with Face-Framing Pieces
Q: How often should I trim layered curls to maintain the shape? A: Every eight to ten weeks is ideal — this keeps the face-framing silhouette fresh and prevents split ends from traveling up the curl.
Q: Will layers make my thin curly hair look thinner? A: The opposite, actually — strategically placed layers remove weight from the bottom and redistribute volume upward, making thin curly hair look fuller and more voluminous.
Q: Can I ask for face-framing layers if I have very tight coils? A: Yes — any curl type can benefit from face-framing layers. Make sure your stylist cuts on dry, defined hair so they can see exactly how each curl will spring and fall.
Q: What products help face-framing curls stay defined in humidity? A: A lightweight anti-humidity gel or curl-defining cream applied while hair is wet and left to fully dry creates the best humidity-resistant definition.
Q: Do layered curls require more maintenance than one-length curls? A: They require slightly more frequent trims, but the styling process is actually easier because layers remove bulk and help curls fall into shape more naturally.
Q: How do I refresh layered curls on day two or three? A: Spritz with a water and leave-in conditioner mixture, scrunch to reactivate the curl pattern, and diffuse briefly or air dry — day two curls often look even better than day one.
2. Half-Up Half-Down with a High Curl Puff
The half-up half-down style with a high curl puff is the perfect balance between showing off your length and adding a playful, elevated dimension at the crown. It pulls the top section of your curls skyward into a full, rounded puff while the rest of your gorgeous long curls cascade freely below.
This style is especially brilliant for extending a wash day — the puff at the top disguises any root tension or flatness while the length below still looks defined and beautiful.
It suits curl types 3A through 4A particularly well, where the curl pattern is defined enough to hold a puff shape while remaining full and bouncy below.
Smooth the sides with a small amount of edge gel before gathering: Clean, smooth sides make the transition from puff to loose curls look deliberate and polished rather than hasty.
Use a silk or satin scrunchie to secure the puff: Silk and satin cause significantly less breakage and frizz than regular elastics, especially on the fragile curl strands at the crown.
Fluff the puff outward once secured for maximum volume: Using your fingertips to gently expand the puff in all directions creates that beautifully rounded, full shape after securing.
Add gold hair cuffs or beaded accessories to the puff base: A few decorative pieces at the base of the puff elevate this casual style into something genuinely eye-catching and photo-worthy.
Apply a light refresher spray to the loose length before styling: A curl refresher spritzed through the lower half reactivates definition and ensures the cascading curls look as fresh as the puff above.
The half-up puff is one of those rare styles that looks better in person than in any photo — and it photographs absolutely beautifully.
FAQs: Half-Up Half-Down with High Curl Puff
Q: How do I get my curl puff to stay round and full throughout the day? A: Fluff it out generously after securing, and use a scrunchie rather than a tight elastic — this maintains shape without causing the puff to deflate from compression.
Q: Can I do a curl puff on very fine curly hair? A: Yes — gather as much hair as possible to the crown, fluff thoroughly, and tease the puff slightly at the roots to maximize volume.
Q: How high should the puff sit for the most flattering result? A: The higher the better for most face shapes — a puff that sits right at the top of the crown elongates the face and looks the most energetic and youthful.
Q: Will a half-up puff cause breakage on my crown curls? A: Using a silk scrunchie and never pulling too tightly significantly reduces breakage risk — also avoid wearing the same style in the exact same spot every single day.
Q: What face shapes does a high curl puff suit best? A: High puffs are universally flattering but work especially beautifully on round and square face shapes by adding height that visually elongates the face.
Q: How do I keep the loose curls looking defined below the puff? A: Apply a curl cream or lightweight gel to the lower section before styling, and use a diffuser or air dry completely before gathering the top into the puff.
3. Loose Defined Curls with a Center Part
Loose, defined curls with a precise center part are the definition of effortless, editorial elegance. The center part creates perfect symmetry that frames the face beautifully, while long, softly defined curls flowing on each side create a look that is both relaxed and genuinely striking.
This style has an almost mirror-like quality that photographs magnificently and looks like you’ve spent much more time on it than you actually have.
It’s most effective for curl types 2A through 3A — where the curl pattern is defined enough to create clear, visible spirals but loose enough to drape beautifully on each side of the face.
Apply a curl-defining cream thoroughly on soaking wet hair: The wetter your hair is when product is applied, the more evenly distributed the product is and the more uniform your curl definition will be.
Use a wide-tooth comb to create a clean, precise center part while wet: Parting on wet hair sets the part direction permanently as the hair dries — fixing it afterward is much harder.
Diffuse upside down for extra root volume: Drying upside down ensures the roots don’t dry flat against the scalp, giving the finished style significantly more lift and bounce.
Separate finished curls with oil-coated fingertips rather than a pick: Oil prevents frizz while separation adds volume — a pick on unprepared curls causes frizz that undoes all the definition work.
Enhance the definition with finger-coiling the front sections: Taking five minutes to finger-coil the curls that frame your face adds definition precisely where it’s most visible.
The center-parted loose curl look is the style that makes long curly hair look like the most enviable thing in the world — because it truly is.
FAQs: Loose Defined Curls with Center Part
Q: How do I keep a center part from shifting as my hair dries? A: Part precisely on very wet hair using a wide-tooth comb, then avoid touching or moving hair until it’s completely dry — shifting it while damp destroys the part.
Q: What’s the best technique for defining loose curl types without crunching them? A: Apply a light curl cream on soaking wet hair, scrunch gently, then air dry or diffuse without touching until fully dry — break the cast lightly afterward for soft, defined curls.
Q: Can I achieve this look on 3B or tighter curl types? A: Yes — apply more moisturizing product, use the elongating technique of pulling curls down gently while they dry, and choose a curl cream with stretch rather than hold.
Q: How do I prevent the center part from frizzing up throughout the day? A: Apply a light pomade or hair serum along the part line after drying — this keeps the scalp area smooth and prevents parting frizz from disrupting the look.
Q: What’s the difference between a curl cream and a curl gel for this style? A: Curl cream provides moisture and soft definition without crunch, while gel provides firmer hold and shine — many curly girls use both layered together for the best of both worlds.
Q: Does a center part work on all face shapes? A: Center parts work best on oval and heart-shaped faces. If you have a very round or square face shape, a slightly off-center part creates a more flattering asymmetry.
4. Curly High Ponytail
A high ponytail on long curly hair is one of the most powerful, high-energy hairstyles available to curl-type girls. It collects all that glorious volume and length and positions it at the crown in a way that is simultaneously practical, glamorous, and deeply satisfying.
The curls cascade down from the gathered point in a beautiful waterfall of texture that looks incredible in motion — and the elevated placement elongates the neck and jawline in the most flattering way.
This style works across all curl types and can be dressed up or down effortlessly depending on the occasion and the accessories you choose.
Use a strong puff cuff or thick fabric tie rather than a thin elastic: A proper puff cuff or wide hair tie maintains the volume of the gathered curls rather than compressing them flat at the root.
Lay your edges with a soft-hold gel and a fine-tooth brush: Clean, smooth edges are the difference between a sloppy high pony and a sleek, deliberate one — take two extra minutes on this step.
Wrap a single curl strand around the base of the ponytail: This classic finishing trick hides the elastic and gives the whole style a polished, elevated look that photographs beautifully.
Fluff and separate the curls after gathering: Once the ponytail is secured, use your fingers to gently pull the curls apart and outward — this creates volume and prevents the pony from looking collapsed.
A silk scarf tied at the base adds instant glamour: Whether tied in a bow or looped casually, a scarf at the ponytail base transforms this everyday style into something genuinely luxurious.
The curly high ponytail is the hairstyle for when you want to feel powerful, polished, and absolutely beautiful without spending more than ten minutes on your hair.
FAQs: Curly High Ponytail
Q: How do I keep a curly high ponytail from drooping throughout the day? A: Use a thick fabric tie or puff cuff rather than a thin elastic, and tease the roots slightly before gathering — this creates resistance that helps the pony stay lifted.
Q: Can I do a high ponytail on very long, very thick curly hair? A: Yes — gather in sections rather than all at once, and use a double-looped strong tie to ensure the weight of all that beautiful length is properly secured.
Q: Will wearing a high ponytail regularly damage my curls? A: Rotating your ponytail placement and using a fabric tie rather than a tight elastic significantly reduces damage — try not to wear it in exactly the same spot every day.
Q: How do I add volume to a curly high ponytail that looks flat? A: Tease the crown section gently before gathering, secure the tie, then use your fingertips to pull the gathered curls upward and outward to expand the pony.
Q: What accessories look best with a curly high ponytail? A: Gold hoop earrings, a silk hair scarf wrapped at the base, or decorative hair cuffs scattered through the pony all complement curly high ponytails beautifully.
Q: Can I add curl clip-ins to my natural high ponytail for more drama? A: Absolutely — curl clip-ins that match your natural texture blend seamlessly into a high pony and add extraordinary length and volume for special occasions.
5. Curly Braided Crown
The curly braided crown is where protective styling meets genuine artistry. Two braided sections from the front of the head are drawn back and secured to create a crown effect, while the rest of your long curls flow freely below — combining structure at the top with wild, beautiful freedom everywhere else.
This style has an ethereal, almost mythological quality that makes it ideal for weddings, formal occasions, festivals, and any moment when you want your hair to feel like an actual crown.
It’s particularly well suited to curl types 3B through 4C, where the curl pattern provides natural grip that holds the braids in place beautifully throughout the day.
Braid while hair is still damp and loaded with leave-in conditioner: Wet hair with slip stays smoother through the braiding process and creates a neater finished braid that lies flat against the head.
Define the loose curls below with a curl cream or custard: The contrast between the neat braided crown and the defined, flowing curls below is what makes this style so visually stunning.
Secure the crown braids with small, strong elastics and bobby pins: Small elastics at the braid ends and a few well-placed bobby pins ensure the crown stays in position even through an active day.
Add flower pins, pearl accessories, or beads to the crown section: A few well-chosen decorative pieces woven into or pinned onto the braids elevate this style from beautiful to genuinely breathtaking.
Refresh the crown braids every two to three days with a light oil: A few drops of argan or jojoba oil smoothed over the braids keeps them looking neat and prevents the style from looking tired too quickly.
The curly braided crown is the hairstyle that makes you feel like the most beautiful person in every room you walk into — and that feeling is completely earned.
FAQs: Curly Braided Crown
Q: How long does a curly braided crown take to do? A: With practice, about 15 to 20 minutes for the braiding plus styling the loose curls — well worth the result for a special occasion or a day when you want to feel extraordinary.
Q: Can I wear a braided crown on type 4C hair without it looking too tight? A: Yes — braid with adequate moisture and leave-in product, and avoid pulling the sections too tightly at the scalp to keep the style comfortable for extended wear.
Q: How do I keep the braided sections smooth without flyaways? A: Apply a small amount of edge gel along the braid length and smooth with a soft bristle brush — this controls surface frizz without making the braids look stiff.
Q: Can I sleep in a braided crown to preserve it? A: Wearing a satin bonnet or sleeping on a silk pillowcase preserves the braided crown well — the loose curls can be refreshed in the morning with a light spritz.
Q: Is a braided crown appropriate for very formal events? A: Absolutely — with the right accessories (pearl pins, floral pieces, or gold cuffs), a curly braided crown is one of the most elegant hairstyles available for formal occasions.
Q: How do I prevent the braid ends from poking out at the back? A: Secure braid ends tightly with a small elastic before pinning, tuck them underneath the braid itself, and use two crossed bobby pins to hold them flat.
6. Long Wash-and-Go with Volume at the Crown
The wash-and-go is the purest expression of long curly hair in its most natural, celebrated form. It involves minimal manipulation, maximum moisture, and a technique focused on building lift at the crown while maintaining definition throughout the length.
Done well, it’s the most effortlessly beautiful style you can wear. It requires no heat, no braiding, and no accessories — just the right products, the right technique, and the confidence to let your natural curl pattern do everything.
This style shines most brilliantly on curl types 3A through 3C, where the curl pattern is defined enough to hold its shape through the drying process with the right product support.

Apply a leave-in conditioner followed by a defining gel while soaking wet: Layering these two products while hair is completely saturated distributes them evenly and creates the maximum definition and hold.
Diffuse upside down during the entire drying process: Drying with your head flipped forward builds lift at the roots that air drying simply cannot achieve — the crown volume on a diffused wash-and-go is genuinely beautiful.
Fluff the roots with a wide pick once completely dry: Using a pick at the roots after full drying adds dramatic volume and height at the crown without disturbing the curl definition below.
Break the gel cast gently with a few drops of oil on your palms: Once the hair is fully dry, softly scrunching with oil-coated hands eliminates any crunchiness and reveals soft, shiny, defined curls underneath.
Deep condition weekly to maintain the hydration this style requires: A wash-and-go looks its absolute best on deeply moisturized curls — dry, brittle hair will not hold definition or volume the same way.
The long wash-and-go done with crown volume is the style that reminds every curly girl why they fell in love with their natural texture in the first place.
FAQs: Long Wash-and-Go with Crown Volume
Q: Why does my wash-and-go lose volume after it dries? A: Likely because the roots are drying flat against the scalp — use a diffuser upside down and fluff the roots with a pick once fully dry to restore lift.
Q: How many days does a wash-and-go last on long hair? A: With proper pineappling at night and a gentle refresh in the morning, a wash-and-go on long hair typically looks great for three to five days.
Q: What’s the best way to refresh a wash-and-go on day two? A: Spritz lightly with a water and leave-in conditioner mix, scrunch to reactivate the curl pattern, and diffuse briefly or air dry — most curly girls find day two curls more defined than day one.
Q: Can I do a wash-and-go on type 4 hair? A: Yes — type 4 wash-and-gos require heavier moisturizing products and benefit from the shingling technique (applying product curl by curl) for maximum definition.
Q: How do I prevent frizz on a wash-and-go in humid weather? A: Use an anti-humidity gel as your final product layer, avoid touching your hair while it dries, and consider a light oil sealant over the surface once fully dry.
Q: Is a wash-and-go damaging to long curly hair? A: A properly moisturized, low-manipulation wash-and-go is actually one of the least damaging styles for natural curly hair — the key is moisture, gentle handling, and avoiding tight manipulation.
7. Curly Side Braid with Loose Ends
The curly side braid with loose ends is the hairstyle that sits at the perfect intersection of romance and practicality. A loose braid sweeps your long curls to one side, containing most of the length elegantly while the curly ends cascade freely below — giving the style both structure and natural movement.
This look has an undeniably romantic quality that makes it ideal for weddings, date nights, garden events, and any occasion where you want your hair to look like it belongs in a magazine.
It suits all curl types and looks beautiful on every hair length from mid-back downward — the longer the hair, the more dramatic and beautiful the effect.
Begin with a deep side part for the most dramatic, romantic effect: Starting the braid from a deep part rather than a centered one creates a more sweeping, asymmetrical look that photographs beautifully.
Keep the braid loose and relaxed rather than tight and neat: A relaxed braid on curly hair has a natural, organic quality that is far more beautiful than a tight, uniform braid.
Leave the bottom third of your length loose and curly: The contrast between the braided section and the freely curling ends below is the defining feature that makes this style so elegant.
Pancake the braid gently after completing it: Pulling each section outward slightly after braiding creates width and fullness that makes the braid look more substantial and impressive.
Thread thin ribbons, baby’s breath, or small pearl pins through the braid: Decorative additions woven through the braid transform this already-beautiful style into something genuinely extraordinary for special occasions.
The curly side braid with loose ends is the hairstyle that makes you look like you belong in a fairytale — and it takes less than ten minutes to achieve.
FAQs: Curly Side Braid with Loose Ends
Q: How do I prevent a side braid on curly hair from unraveling throughout the day? A: Start from a lower placement near the nape rather than the crown, and secure firmly with a strong elastic — lower braids stay in position far better on curly hair.
Q: Can I do a fishtail braid version of this style on curly hair? A: Yes — a fishtail braid on curly hair creates extraordinary texture and visual interest, and the curly loose ends below make it look even more romantic.
Q: How do I prepare curly hair before braiding for the smoothest result? A: Apply a smoothing cream or leave-in conditioner on damp hair and let it partially dry before braiding — this reduces frizz in the braid while keeping the loose ends curly.
Q: Will braiding long curly hair cause damage to my ends? A: Braiding on moisturized hair with no rubber bands, loose tension, and protective loose ends is one of the gentler styles you can wear on long curly hair.
Q: What curl type produces the most beautiful result in a side braid? A: All curl types look gorgeous, but types 3A through 4A produce particularly beautiful texture contrast between the braided section and the curly loose ends below.
Q: How do I add volume to a side braid that looks flat on fine hair? A: Tease the crown section very lightly before gathering, and be generous when pancaking each braid section outward — the visual fullness this creates is significant.
8. Long Curly Curtain Bangs
Curtain bangs on long curly hair are one of the most face-flattering additions you can make to your look without sacrificing a single inch of your length. They’re parted softly down the middle and drape to each side of the face, adding a gentle fringe that draws attention to your eyes and creates a beautiful softness around the face.
When cut specifically for curly hair — which means cut longer than straight hair curtain bangs to account for curl shrinkage — they blend seamlessly into the layers below and look completely natural.
This style works best for curl types 2C through 3B, where the curl is defined enough to hold the curtain bang shape without becoming too frizzy or losing its fall.
Dry curtain bangs separately from the rest of your hair: Using a diffuser focused specifically on the bang section ensures they dry with full definition before the weight of the surrounding hair affects their shape.
Apply a small amount of mousse or foam to the bangs while wet: Light-hold mousse gives curl definition without weighing the bangs down or causing them to lose their gentle curtain drape.
Finger-coil the bang sections on particularly frizzy days: Taking thirty seconds to individually coil the bang curls around your finger while applying product gives extra definition on days when the weather isn’t cooperating.
Ask your stylist to cut curtain bangs longer than you think you need: Curly hair has significant shrinkage — bangs cut to chin length when wet may spring up to eye level when dry, so communicate clearly about your desired dry length.
Refresh curtain bangs between wash days with a small amount of water and curl cream: Spritzing and scrunching the bangs lightly reactivates their curl pattern and keeps them looking defined even on day three or four hair.
Curtain bangs on long curly hair are one of those style decisions that feels transformative — in the very best way.
FAQs: Long Curly Curtain Bangs
Q: How much length will curly curtain bangs lose to shrinkage? A: Depending on your curl type, shrinkage can reduce length by 30 to 50 percent — always communicate your desired dry length to your stylist and cut conservatively at first.
Q: How do I keep curly curtain bangs from frizzing away from my face? A: Apply a light-hold cream or mousse while wet and diffuse separately before allowing to air dry — and avoid touching them while they’re still drying.
Q: Can I get curtain bangs on very tight coil patterns? A: Yes, though the shrinkage will be more dramatic — work with a stylist experienced in cutting natural coily hair so they can account for your specific curl’s shrinkage pattern.
Q: How often should curly curtain bangs be trimmed? A: Every six to eight weeks — they grow and change shape relatively quickly, and regular trims keep the curtain shape looking intentional rather than overgrown.
Q: Will curtain bangs suit my face shape? A: Curtain bangs are among the most universally flattering bang styles because they open the face rather than covering it — they particularly suit round, heart, and square face shapes.
Q: Can I push curtain bangs to one side instead of down the center? A: Absolutely — curtain bangs are versatile enough to wear swept to one side for a different look, or pinned back entirely on days when you don’t want to style them.
9. Twist-Out on Long Hair
The twist-out on long hair is one of the most celebrated styling techniques in the natural hair community — and for very good reason. It creates a uniform, elongated curl pattern with extraordinary definition, shine, and volume that no other technique quite replicates.
On long hair, the visual impact of a well-executed twist-out is simply breathtaking. The uniformity of the pattern, the stretch that shows your length, and the fullness created by separation all combine into something that looks both natural and deliberately beautiful.
This technique is most effective and most rewarding for curl types 3C through 4C, where the natural curl pattern benefits most from the elongation and definition that twisting provides.
Twist on thoroughly moisturized, damp hair using a butter or curl pudding: Twisting on dry or under-moisturized hair creates a brittle, frizzy result — moisture is the foundation of a successful twist-out.
Allow twists to dry completely before unraveling: Patience here is absolutely critical — unraveling even slightly damp twists causes frizz and disrupts the definition permanently.
Unravel each twist using oil-coated fingertips from the bottom up: Starting at the ends and working upward preserves the curl pattern and prevents the frizz that comes from separating too aggressively at the roots.
Separate thoroughly but gently for maximum volume: The more you separate, the bigger and fuller the twist-out becomes — just maintain gentleness throughout to keep frizz controlled.
Use smaller twists for a tighter, more defined result: Smaller twists create more individual curl sections when unraveled, producing a denser, more defined pattern that lasts longer between refreshes.
The twist-out on long hair is the style that proves definitively that natural curly hair is some of the most beautiful, versatile, and extraordinary hair texture that exists.
FAQs: Twist-Out on Long Hair
Q: How long should I leave twists in before unraveling for a twist-out? A: At minimum, until the twists are completely dry — overnight drying is ideal for long hair, either air drying under a bonnet or drying briefly under a hooded dryer.
Q: How do I make a twist-out last multiple days on long hair? A: Pineapple at night in a loose, high ponytail secured with a satin scrunchie, sleep on a satin pillowcase, and refresh in the morning with a very light mist of water.
Q: What’s the best product combination for a defined twist-out? A: A moisturizing leave-in conditioner followed by a curl butter or pudding gives the best combination of moisture, definition, and lasting hold for most curl types.
Q: Can I do a twist-out on type 3 curls or is it mainly for type 4? A: Twist-outs work on all curl types — type 3 curls benefit from the definition and elongation, while type 4 curls benefit additionally from the significant frizz reduction.
Q: How do I revive a twist-out on day three or four? A: Spritz very lightly with water, smooth a tiny amount of oil over the surface, and scrunch gently — excessive product application at this stage causes buildup rather than refreshing the style.
Q: Do I need to use a hooded dryer for a successful twist-out on long hair? A: A hooded dryer speeds up the process significantly and produces a very even dry, but overnight air drying under a satin bonnet works equally well if you have the time.
10. Protective Pineapple Style Worn as a Daytime Look
The pineapple began as an overnight protective style — a loose, high gathering of all curls at the crown that prevents them from being crushed during sleep. But somewhere along the way, curly girls discovered that it also makes a genuinely stunning daytime hairstyle, and the rest is glorious history.
All your long curls are gathered loosely at the very top of your head, where they tumble forward and downward in a dramatic cascade of texture and volume. The result is high, bold, and undeniably beautiful.
This style works magnificently for curl types 3B through 4B, where the curl pattern and natural volume create the most impressive crown effect.
Use a silk or satin scrunchie and keep the gathering loose: A loose gather is the entire point of the pineapple — tight securing defeats the purpose and compresses the curls rather than letting them spring freely.
Gather all your hair as high on the crown as possible: The higher the placement, the more dramatic and beautiful the cascading effect — aim for the very top of your head rather than the upper-back.
Pair with bold gold hoop earrings for instant glamour: The exposure of your neck and face that the pineapple creates makes earrings particularly visible and impactful — make them count.
Wrap a printed or colorful scarf around the pineapple base: A scarf at the base adds a vibrant, fashionable element that takes this protective style straight into high-fashion territory.
Refresh the exposed curls with a light spritz of water and oil: The curls that tumble forward from the pineapple are the most visible part of the style — a quick refresh makes them look defined and intentional rather than slept-in.
The pineapple as a daytime style is one of the most joyful, confident, and beautiful expressions of long curly hair — and it transitions perfectly from morning errands to evening dinners without a single adjustment needed.
FAQs: Protective Pineapple as a Daytime Style
Q: How do I keep a pineapple from drooping throughout a full day? A: Use a strong fabric scrunchie or puff cuff rather than a thin elastic, and gather the hair as tightly into the base as possible while still keeping the volume loose above.
Q: Can I do a pineapple on very long hair without the curls hanging too far down? A: For very long hair, a double pineapple (gathering in two sections rather than one) keeps everything at the crown rather than allowing it to droop too low.
Q: Will wearing a pineapple daily cause breakage at the crown? A: A loose silk scrunchie and varying the exact placement slightly each day significantly reduces breakage risk — just avoid tight tension at the base.
Q: How do I make a pineapple look intentional rather than like an afterthought? A: Edge control along the sides, a beautiful scrunchie or scarf at the base, and a light refresh of the cascading curls makes it look like a deliberate style choice rather than a quick fix.
Q: Can I wear a pineapple with straight or wavy hair? A: The pineapple as a style specifically celebrates the volume and texture of curly hair — it’s designed for and looks most beautiful on natural curl patterns.
Q: How do I prevent the pineapple from leaving a dent or crease in my curls? A: Using a wide, soft fabric scrunchie rather than any kind of elastic or tight tie distributes pressure more evenly and leaves far less of an indentation on the curl pattern.
The Products That Make Long Curly Hair Truly Thrive
What you put on your curls matters just as much as how you style them. Long curly hair has specific needs — it requires moisture, definition, and a product routine that builds on itself rather than weighing the hair down.
A quality leave-in conditioner is the non-negotiable foundation of any curly hair routine — it provides the baseline moisture that every other product builds on. Layered with a curl-defining cream for soft definition or a firm-hold gel for maximum pattern retention, a good leave-in creates the conditions for genuinely beautiful curls. For twist-outs and protective styles, a curl butter or pudding adds the slip and weight that coiling techniques require to unravel cleanly and definitively.
Finishing with a light natural oil — argan, jojoba, or sweet almond — broken through dry curls adds shine, reduces frizz, and gives long curly hair that rich, healthy look that turns heads in every direction you walk.
When Long Curly Hair Becomes Your Superpower
There’s something that happens when a curly girl finds the styles and techniques that work with her specific texture — a kind of confidence that shows up not just in her hair but in how she moves, how she holds herself, and how she shows up in the world.
Long curly hair is not a challenge to be managed or a problem to be solved. It is a genuine superpower — a living, breathing expression of who you are that changes with the weather, the seasons, and your own emotional landscape. It grows, it shifts, and it rewards patience, moisture, and care with volume and beauty that straight hair simply cannot replicate.
Every style in this guide is an invitation to get to know your curls more deeply, to experiment with what makes them feel their best, and to celebrate the texture that makes you uniquely, beautifully yourself.
Bloom, Coil, Flourish — Your Curls Are Ready
Long curly hair at its healthiest and most celebrated is one of the most beautiful things in the world. These ten styles are the starting point — the techniques, accessories, and approaches that help your curls reach their full, gorgeous potential.
Pick the style that calls to you first. Practice it a few times until it feels intuitive. Then try the next one. Your curl journey is ongoing, deeply personal, and endlessly rewarding.
Give your curls the moisture they crave, the products they deserve, and the styling they respond to. Watch what happens when you simply get out of their way and let them be extraordinary.
Your curls are not just hair — they are your crown, and they are absolutely magnificent.


